Checkout overview
Checkout is a hosted payment page integration. Your server creates a payment session via the Checkout API; Payment Platform renders the payment form, handles card data entry and 3DS authentication, and redirects the customer back to your site when the transaction is complete. This page explains how the flow works, what the merchant is responsible for, and the configuration options available.
Introduction
The Checkout service is a fast and easy way to create a secure payment page. It allows collecting and submitting payments and sending them for processing.
To use the Checkout service on the site you have to integrate it into your system.
The Checkout integration provides a set of APIs that allow customizing payment processing for the business. These protocols implement acquiring payments (purchases) using specific API interaction with the merchant websites.
The API requires request data as json string data and responds also with json string data.
How it works
Both card and alternative payment methods are supported. The end-to-end flow:
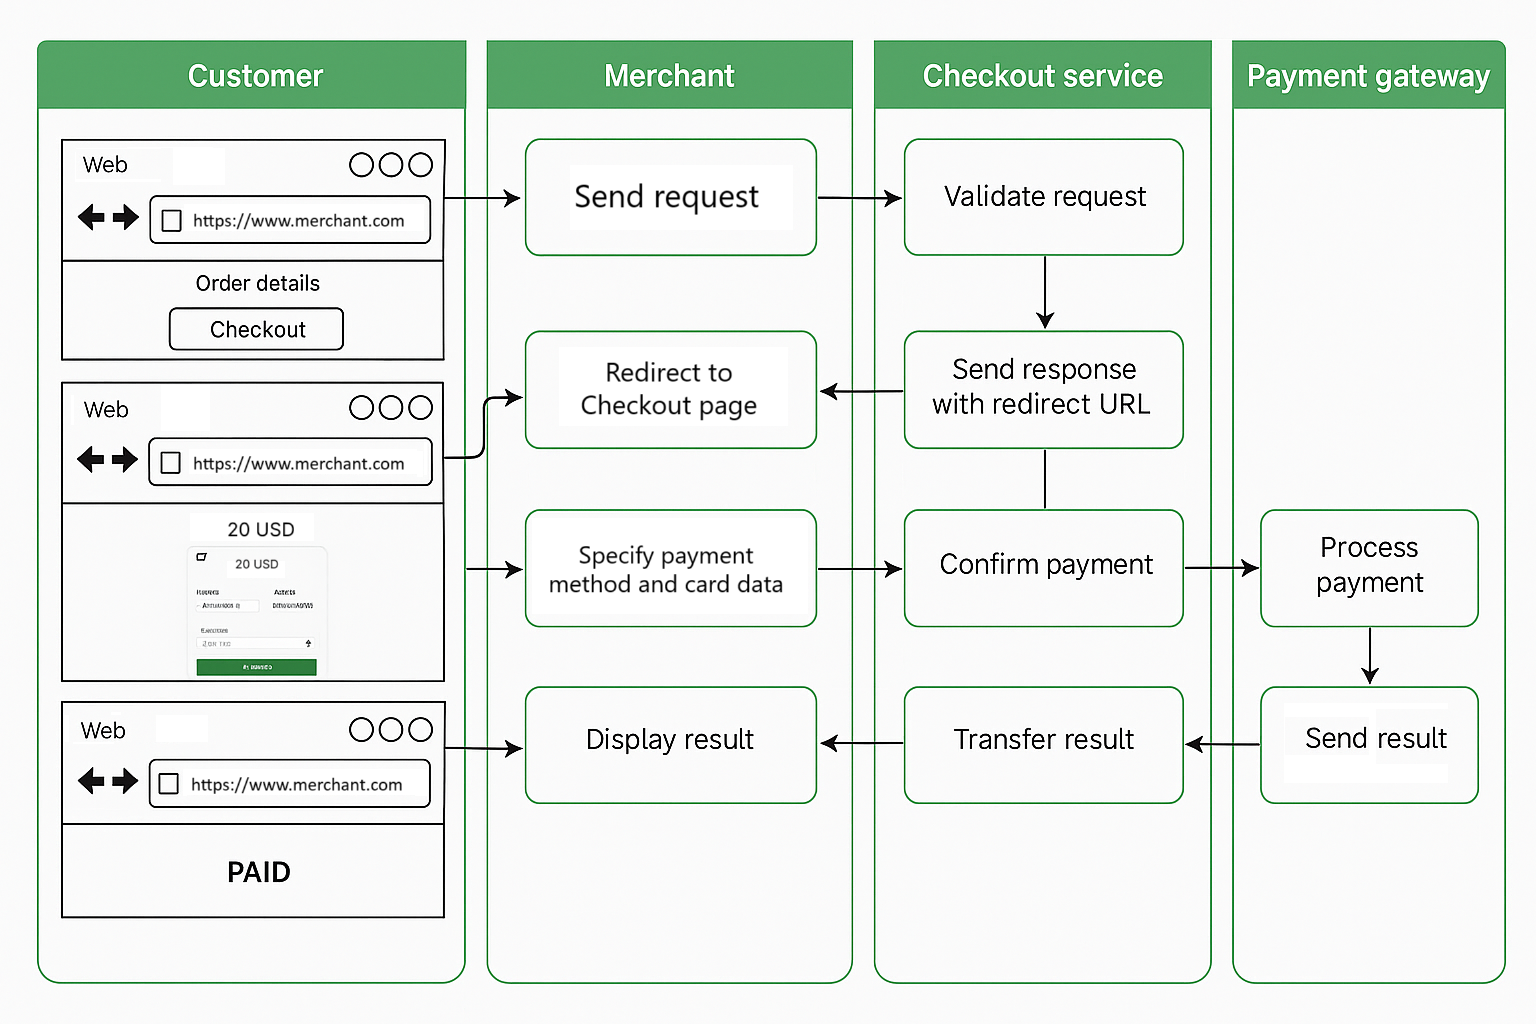
- Customer initiates payment on your site.
- Your server sends a signed
POST /api/v1/sessionto Checkout. - Checkout returns a
redirect_url. Your server redirects the customer there (or embeds it in an iFrame). - Customer pays on the Checkout page (cards, APMs, crypto, etc.). 3DS / redirect flows are handled by Checkout.
- Payment Platform sends a signed callback (webhook) to your
notification_urlwhenever the transaction state changes. - Customer is redirected back to your
success_urlorcancel_url. - Your server uses the callback as the source of truth, fulfills the order, and shows the result.
The payment could be declined in case of invalid data detection.
What you should implement
- Computing
hashfor outbound requests - Verifying
hashon inbound callbacks - Storing
payment_idandorder_numbermapping - Idempotent callback handler (HTTP 200)
- Configuring
notification_urlfor your merchant (admin panel only; see Callbacks) - Supplying
success_url/cancel_url/ optionalexpiry_urlin each authentication request
For operation types (purchase, debit, credit, transfer), see Operations.
Prerequisites
- CHECKOUT protocol mapping must be enabled for your merchant. Without it, payments are rejected. Verify in admin panel → Configuration → Protocol Mappings.
- DMS mode (two-step payments) is configured per MID. In DMS the auth response is
pendinguntil a capture is performed. See DMS mode.
Configuration
Learn about the basic configuration of the Checkout.
Postman collection
Download and test the Checkout Postman Collection:
Protocol Mapping
Check the existence of the protocol mapping before using the Checkout integration.
Your protocol mapping is configured by the system admin in the admin panel.
warningThe Checkout protocol must be mapped before you can take payments. An admin configures this in the admin panel.
For customer return URLs, redirect parameters, and how to configure brand and payment_method in return URLs, see Redirects and returns.
DMS mode
If you need to use Checkout integration to work with payments in DMS-mode (two-step payments), your administrator will enable DMS at your request.
In this case:
- The payment request will be processed as an authorization stage for DMS-mode.
- The capture requests will be generated and gathered in the queue.
- You can monitor and manage the capture request queue via the admin panel.
- You can also initiate Capture on demand via API request.
tipDMS can be controled via API as well: The parameter
authis a string with the valueYorN(defaultN). It indicates that a transaction must be only authenticated, but not captured.
Pre-routing
To make payment method choice easier for the Customer, pre-routing is provided on the Checkout.
The functionality allows you to set up matches in the admin panel via the Custom routing module, which will determine the list of payment methods suitable for the current payment.
This way, you can restrict your Customers from randomly choosing a payment method that is not available in their region, for example. This will help you to increase the number of successful payments and reduce the risk of declined transactions.
Note that if the Authentication request contains a list of the payment methods in the methods array, then the pre-routing configurations will be ignored.
Card data tokenization
For regular customers, we have made the payment page even more convenient and simple.
You can save the customer's card data so that they can reuse it for future payments.
To do this, you need to send the req_token = true parameter in the Authentication request. And then, in the callback, you will receive a card token.
Use the token when sending the next Authentication request and your client will see anonymized card details on the payment form, which will greatly simplify the payment process.
For the full flow, including payments without the customer, see Card-on-File payments.